
We decided to upgrade our small sink to a sleek Ikea Godmorgon & Braviken: a 2-drawer vanity and 2-faucet sink, respectively. Here is a picture from the IKEA website:

After spending several days thinking over how to install the sink, it appeared I had to spread different tasks over several days:
Step 1: Upgrade our water shut-off valves
Step 2: open drywall, install 2×6”, close the drywall & make it look nice again
Step 3: install everything
But first of all, the Ikea instruction manual for the Godmorgon contains too little information. One key measurement that’s missing is the clearance between the drawers and the wall. If the plumbing coming out of the wall (i.e. the shut-off valves and the waste line) exceed that measurement then the drawers won’t shut close.
So here it is: the clearance is 3 3/4”. The very first thing I had to do was shut-off our main water line and shorten the cold water supply copper pipe by about 1”. For that I needed a small tube cutting tool (cf. photos below), two adjustable wrenches, a bucket and lots of rags.
Then something I hadn’t thought of and that the Ikea instruction manual wasn’t about to tell me was that I needed to upgrade our shut-off valves from single outlets to dual outlets, since we were going to install two faucets. Duh. So I bought two Brasscraft CR1901LRC1 from Amazon.

Next episode: reinforcing the drywall
~~~
Photos: after removing the old sink & vanity it appears that the right pipe (cold water) protrudes by about 4”.
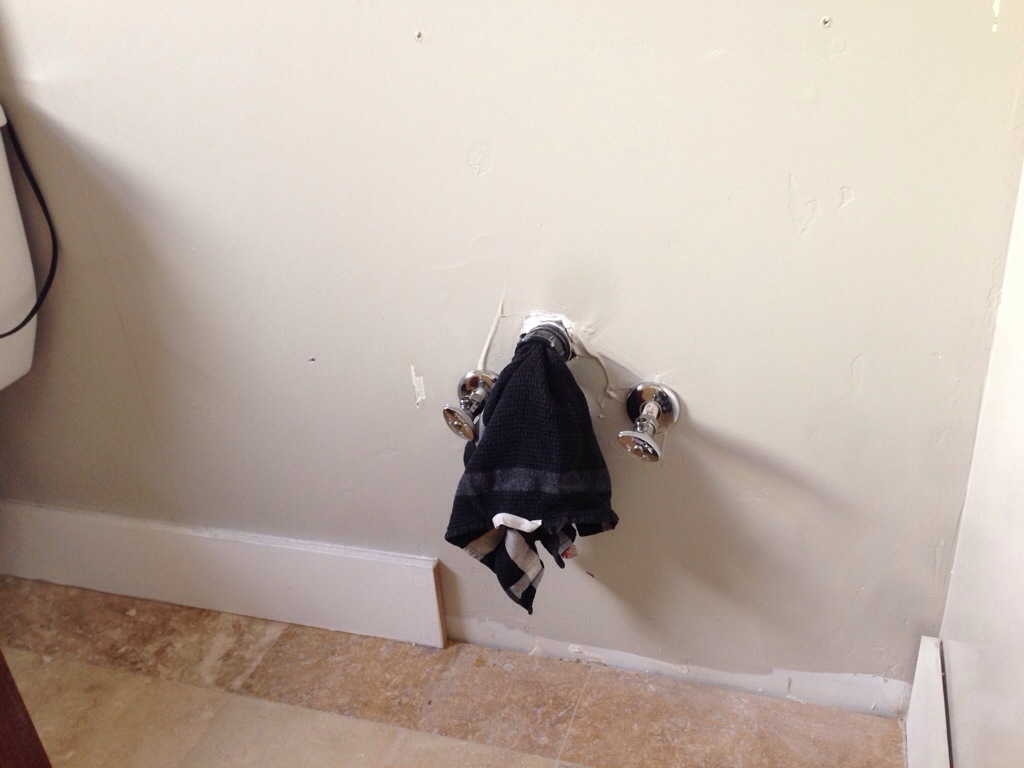
I cut 1” off with a tube cutting tool I bought at Ace hardware.

I put back our old single outlet instead of the new dual outlet because I knew I just couldn’t get it all done in one day. Then I put the old vanity and sink back and waited until next weekend for part 2.


This information is so much more helpful than the Ikea instructions! Question- how did you reattach the water cut off valves-did you have a threading tool or solder them or…?
No need to solder or thread – I used compression fittings.
Thank you!
how high is the drawer sides and how tall is the drawer fronts?
Good to know. Why did you have to put 2 X 6 z in your wall?
I had to add 2×6 to make so that the vanity is anchored in some sturdy 2×6 instead of the drywall only! Another solution I’ve seen on the internet is to put a sturdy lateral reinforcement inside the vanity and anchor it into the studs in your drywall.
If you are lucky and your studs are aligned with the vanity then you’re fine!
Ok thanks. I am doing new construction with 2X4 studs with blocking behind the drywall. I wasn’t sure if Ikea recommended 2X6 studs since the unit is hanging off the wall or just another missing installation tip absent in the instructions. Thanks for the help.
Oh i understand your question now – 2×4 is fine, i just happened to have some leftovers 2×6 from a planter box project
Thanks so very much for including the 3.75″ dimension. Trying to head off problems on our renovation. There is nothing like paying the plumber twice! Looked all over the IKEA website for that information/drawing. Our next step would have been to make ANOTHER trip back to IKEA with a tape and start pulling out drawers and crawling around on the floor. I don’t really understand why IKEA would not include the information that would help folks make a realistic buying decision and have a successful installation. We have done our framing beef up, without IKEA instructions. I wonder how many folks have to make a trip back for the optional legs when their beautiful floating vanity starts to sag from the wall or worse. Thanks again.
Isn’t it annoying? Indeed I had to go back to Ikea just for that measurement 🙂
Oh you just made my day, I was looking everywhere for the distance between the wall and the back of the Godmorgon drawer. Thank you!
Seriously, I just scoured the Ikea website to figure out the ONE measurement I wanted to know, and lo and behold you have it here: 3 3/4″ clearance from the back of the cabinet to the drawers. Thanks so much!
Great post! Just wondering after more than 2 years of use, how’s the sink and cabinet holding up? I have several IKEA bathroom sinks and they are show signs of use after only a few years. They are all porcelain sinks, one is showing a hairline crack! Just wondering if you have any durability issues with the sinks and/or cabinet.
We sold our house in July this year (2016) but the sink was holding up great! Despite having two kids climb on it every single day to brush their teeth. No wobble either: adding studs in the drywall really helped. Here is the staging photo:

Thanks for the feedback. Congrats on the move!
I can’t thank you enough! As a single girl doing her own plumbing this is invaluable !
Hi. I would appreciate any help from those that have this vanity. We didn’t notice until after installation, that the drawers are unable to open fully because they hit the bathroom door trim. The vanity has to be installed against the wall and can’t be moved over to accommodate this. I notice this a lot in other pics online. Has anyone modified their door trim to allow for this or are the drawers not used?? I feel foolish for not thinking of this before we bought it.
Hi it almost happened to me too,I will add that to my blog post. I hope you can find enough patience and clearance to shift the vanity by an inch, I think removing the door trim will not look good
Thank you so much for sharing this info. I’d like to install one of these right up against a wall on the side, but realize I’ll need some clearance there in order to get the drawers open without scraping the wall – can you tell me how much clearance on the sides you think is needed & would look ok?
Oops, I forgot to check “Please notify me of new comments via email – so doing it here. Thanks for any advice!